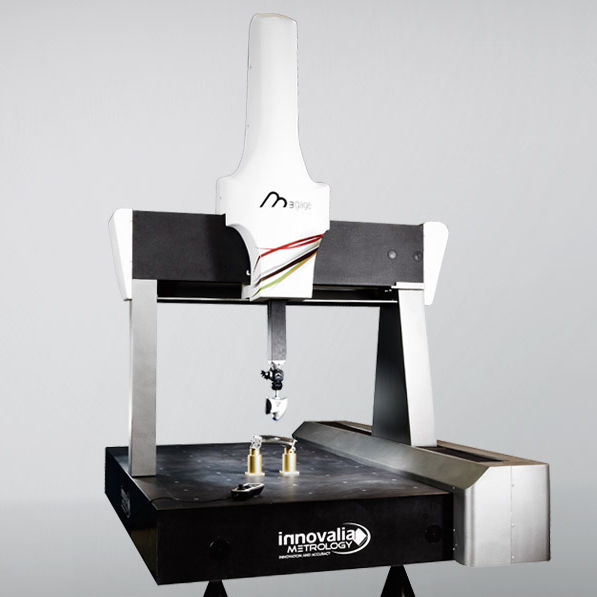
Scanning sensor OptiScan with M3 software and Spark Gage equipment

DESCRIPTION
OptiScan
It is a high-speed scanning laser sensor that allows high performance scanning technology to be integrated into manufacturing processes.
OptiScan provides the best performance for the capture of 3D point clouds of the highest definition for the automotive, aeronautical, wind, electronics and consumer industries.
OptiScan offers a new way to inspect the quality of its products by obtaining a digital copy and automating both dimensional and comparative measurements against CAD.
It is designed to optimize work and simplify reverse engineering and inspection processes and to increase the productivity of quality control, creating efficient measurement processes.
M3 Software
High performance software for the capture and analysis of point clouds.
M3 solves the complex process of scanning and managing point clouds in an agile, powerful
and simple way.
Reverse engineering module
The asset has algorithms for reverse engineering.
Through 3D scanning and digitization of the piece, surface reconstruction is carried out for those pieces that do not have an initial CAD model. For this the asset has Poisson algorithms that carry out the parallelization and get the reconstruction of the piece trying to approximate the function of an extrapolated solid. This algorithm is quite reliable in filling small holes and treating non-uniform data. In this way, a valid CAD is generated for additive manufacturing.
Standardization of information according to STEP 242
In the scope of the AM certain pieces cannot be printed because the quality of the CAD is low. For this purpose, the asset has the appropriate algorithms for reading the metrological information integrated in the 3D models under the STEP 242 standard, elaborating geometry extraction algorithms for the point cloud.
The system that has been developed to facilitate the exchange with other quality control environments is able to export in STEP CAD format, not only the definition of the mathematical and topological model of what each geometry represents (vertices, faces, etc.). ) but also the proper definition of geometry.
With the results of the measurement we can generate an exportation of the geometry to an auxiliary CAD file in STEP format, with all the information.
Automation and management of the total quality of the AM
3D CAD models include quality information that facilitates the incorporation of AM into production. Through the generation of information from 3D digitized and reverse engineering, the generation of a CAD model valid for additive manufacturing is carried out. From this model, the digitization and the generation of analysis and reports are automated.
The adoption of STEP242 allows the M3 software for point cloud analysis to extract from the 3D CAD model the data necessary for the automation of both the digitization process (based on the dimensional characteristics of the piece), the measurement plan (based on the integrated metrology information) and final reports (based on the critical requirements of manufacturers and producers).
An extraction system has been realized from the CAD, in which, passing as parameters the type of geometry and a point X, Y, Z, [i, j, k], the system can obtain none, one or several candidate geometries from which to take their values as nominal.
In this way, the integration of dimensional quality processes is enhanced without resulting in a high added cost in terms of configuration and tuning. The ability to report information on the quality of the manufacturing process is the key factor that allows the integration of additive manufacturing for the industrial production.
Spark Gage
Spark Gage is an asset that offers technology to support processes related to additive manufacturing and is key to its use, providing a 3D inspection service (scanning, metrology). In addition, it provides a knowledge of the piece for the realization of a process of reverse engineering.
The Spark is a bridge type equipment and is characterized by a robust and simple construction. The machine is made of natural granite in its three axes, which provides great dimensional stability and very precise movements.
The reading scales are installed on Robax material (thermally inert) which, together with the construction in granite, make the Spark a machine with a great behavior under temperature variations.
MOST OUTSTANDING EQUIPMENT AND COMPONENTS
M3 serverThe M3 database uses the standard VPX (Virtual Part Exchange) that allows the information to be stored, shared and filtered with great efficiency, connecting the database directly with the scanning system and the software.
High performance software for the capture and analysis of point clouds
Scanning laser sensor that allows to obtain high precision 3D digitalisations for reverse engineering applications, virtual metrology, automated inspection and robot guidance.
Bridge type CMM for scanning, digitalizing and reverse engineering.
SERVICES OFFERED BY THE ASSET

Analysis of results

Automation and management of the quality of the AM

Measurement

Optimization of 3D geometry

Reverse engineering process for additive manufacturing parts

Training
ENTITY MANAGING THE ASSET

ASOCIACIÓN DE EMPRESAS TECNOLÓGICAS INNOVALIA
Contact person: Alicia González Cabestreros


